Dec 17, 2025·6 min
Return Request Form With Status Updates for Small Shops
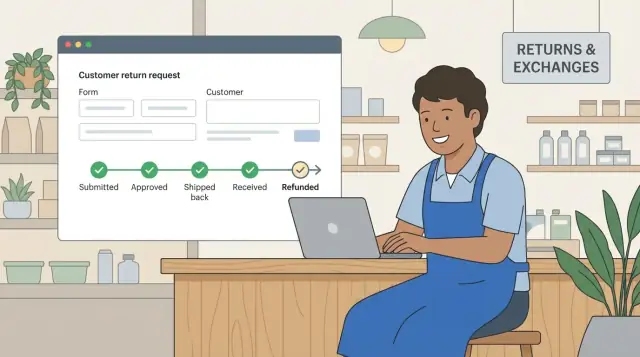
Set up a return request form with status updates so customers know what happens next, and your shop can approve, receive, and refund without confusion.
Set up a return request form with status updates so customers know what happens next, and your shop can approve, receive, and refund without confusion.
Returns get messy fast in a small shop because the process often lives in email threads, DMs, and sticky notes. One customer forgets the order number, another sends photos a week later, and you end up asking the same questions over and over.
Customers usually want two answers right away: did you receive my request, and what happens next? When they can’t see progress, they follow up. That creates extra work and can make the shop feel disorganized, even when you’re handling everything carefully.
Clear stages fix this by turning a vague back-and-forth into a simple path. A return request form plus status updates gives customers one place to submit details and one place to check what’s happening. You spend less time hunting for context and more time making decisions.
Stages also create a paper trail. You can capture proof (photos, reason, condition), set expectations (time limits, shipping steps), and keep the return moving without relying on memory.
Clear stages usually reduce a few repeat problems:
A simple example: a customer messages, “My sweater arrived damaged.” Without stages, you ask for photos, then the order number, then confirm what they want, then explain where to ship it, spread across multiple messages. With clear stages, the request comes in complete, you approve or deny once, and the customer sees the next step without chasing you.
The goal isn’t paperwork. It’s keeping the whole return in one place: submit, review, approve, receive the item, and close the case.
A good returns workflow is a path both you and the customer can follow without extra emails. It starts with one clear request and moves through a few predictable stages until the case is closed.
Most small shops get into trouble when returns are scattered across channels: one message in Instagram, another in email, and a third in a marketplace inbox. A single form with status updates keeps the request, decision, shipping details, and outcome together.
A clean workflow usually looks like this:
Each step should change the status so nobody has to guess what’s happening.
Customers care about two things: “Is my return accepted?” and “What happens next?” Keep customer-facing stages simple and action-oriented, like “Under review” or “Approved - ship it back.”
Internally, you may track details customers don’t need to see: inspection notes (“missing tag,” “wear marks”) and reminders (refund deadline, restock action). Show customers only what helps them act.
Example: a customer returns a hoodie because the size is wrong. They submit the request once. You mark it “Needs info” to request a photo of the size tag, then “Approved - ship it back” with packing instructions. When it arrives, you switch to “Received - inspecting,” then “Refunded” or “Exchange shipped.” Both sides can check the latest status instead of sending follow-ups.
A good return form does two jobs: it gives you enough detail to decide quickly, and it sets clear expectations for the customer. Gather the right info upfront and you won’t spend your day chasing people for basics.
Start by making it easy to match the request to a real purchase. For many shops, an order number plus the email used at checkout is enough. If customers often buy as guests or forward receipts, add a purchase date as a backup.
Next, capture exactly what’s coming back. “The shirt” isn’t enough when you sell variants. Ask for the specific item and quantity. Then ask for the reason in plain language: a short dropdown (wrong size, changed mind, arrived damaged) plus an optional text box for details.
Core fields that cover most cases:
Condition questions prevent surprises later. Keep them yes/no and add one short line explaining why you ask.
If “damaged” is selected, allow photo upload. You can keep photos optional overall, but strongly encourage them for damage claims. One clear photo often saves a long back-and-forth.
Customers don’t want to learn your internal process. They want a clear answer to one question: “What happens next?” Keep stages short, predictable, and limited. For most small shops, 5 to 7 statuses is plenty.
Use status names that describe an action, not a department. “Waiting for warehouse review” creates questions. “Received” and “Refunded” don’t.
Here’s a set that fits most products:
Then end with an outcome status: Refunded or Exchanged. If you want a shipping stage, add Shipped back after Approved.
A simple rule works well: customers can submit a request and add information, while staff control official stage changes.
For example, customers can trigger “Submitted,” and when you request missing details they can respond to move the case out of “Needs info.” Keep “Approved,” “Rejected,” “Received,” and the final outcome staff-only so the timeline stays trustworthy.
Add timestamps to every status change. You want to spot “stuck in Received for 6 days” without digging through messages.
Most “Where is my refund?” messages happen because customers can’t see what you see. Status updates fix that when they’re tied to key milestones.
Notify on the moments people care about, not every tiny change. Too many updates can feel noisy and lead to replies.
Milestones that do the most work:
Keep each message to three parts: (1) current status in plain words, (2) what you need from them (if anything), and (3) what happens next and when.
Example copy for “Received”: “We’ve received your return (RMA 1042). We’ll inspect it within 2 business days. If approved, your refund will be issued the same day and may take 3-5 days to appear on your statement.”
You can set up a return request form with status updates in a single workday if you keep decisions simple and write them down before you touch any tools.
Rewrite your policy as quick decision points: “Is the order within 30 days?” “Is the item unused?” “Is this category excluded (final sale, custom items, gift cards)?” If staff can’t answer fast, customers will email and staff will guess.
Keep the form short, but collect what you need to approve without a follow-up. Require what blocks approval and leave the rest optional.
A practical one-day setup:
Pick a small set of stages that describe what’s happening right now. Decide which ones are staff-only and which can be automatic (like “Submitted” after form completion).
Avoid internal language unless customers already know it.
Use two note areas. Internal notes are for inspection details and exceptions. Customer-visible notes should be short and action-based, like packing reminders or the next step.
Run one pretend return from start to finish. Submit the form, approve it, move through each status, and check every notification. Make sure each message includes the next step and a timeframe.
A customer, Maya, buys a pair of shoes from your shop. They arrive fast, but the size feels tight. She doesn’t want to argue in email threads. She just wants to know what to do next.
She opens your return form and fills it out in two minutes: order number, item, reason (“size too small”), and whether she wants an exchange or a refund. She adds one note: “Worn indoors for 2 minutes. Tags still on.”
On your side, the request appears in the first stage. You check the order, confirm it’s within your return window, and approve it. Maya receives one short message that covers where to ship it, how long she has, and what happens after you receive it.
A simple timeline might look like:
When the box arrives, you mark it Received right away. That one update often prevents “Did you get it?” emails. After inspection, you process the refund and close the request. Both of you can see the full history later if there’s a question.
Most return workflows break for one reason: they ask customers to do too much, then leave them guessing what happens next. A returns flow should feel like checking package delivery, not like filling out a tax form.
The first trap is a heavy form. If you require every detail upfront (SKU, serial number, long descriptions, multiple photos), customers quit and email you anyway. Start with the minimum needed to identify the order and the issue.
The second trap is vague statuses. “Processing” could mean anything. If a status doesn’t tell the customer their next step, it will create follow-ups.
Damage claims are another frequent dispute point. If you accept “arrived broken” without photos, you may end up arguing later about when the damage happened.
Finally, many shops forget timelines. When customers don’t know when you reply or when refunds happen, they check in daily.
Before you publish your form, do one dry run as the customer and one as staff. If you can decide the outcome in one review and the customer can see progress without emailing you, you’re close.
Test one realistic scenario: an exchange request with a photo upload and a shipped return. Make sure you can move statuses quickly and close the case cleanly.
Once the workflow is live, focus on keeping it clean.
Only collect data you actually use. For many shops, that’s order number, item, reason, preferred resolution, and a photo when it helps. If you don’t need a phone number or full address at the first step, don’t collect it.
Decide who can see and change return requests. Even in a small team, clear roles prevent mistakes: support can review and request details, warehouse can mark received and inspected, and an owner or manager can approve refunds and close cases.
Keep an audit trail as you grow. Every status change should record who changed it, when, and a short note if something unusual happened.
Plan for exports or backups before you need them. At minimum, make sure you can export return records for reporting, accounting, or moving systems.
If you want to build a lightweight returns tracker instead of stitching together spreadsheets and inboxes, Koder.ai (koder.ai) can generate a small web app from chat prompts, including form fields, status stages, and notifications. When you’re happy with it, you can export the source code and run it in your own setup.
Use 5–7 statuses that tell the customer what to do next. A simple default is Submitted, Needs info, Approved, Rejected, Received, and a final outcome like Refunded or Exchanged.
Make the form “approval-ready” by collecting the order number, the email used at checkout, the exact item and quantity, the reason, and what they want (refund, exchange, or store credit). Add a quick condition check so you don’t get surprises when the package arrives.
Start with Needs info and ask for one specific missing thing, like a photo of the damage or the order number. Avoid asking a long list of questions at once; one clear request gets faster replies and keeps the case moving.
Yes, if damage claims are common or expensive for you. A practical default is to require photos only when the customer selects “arrived damaged,” and to prompt for a photo of the item plus the outer packaging so you can spot shipping-related issues.
Send updates at milestones: confirmation when submitted, instructions when approved, confirmation when received, and a clear completion message when refunded or exchanged. Too many notifications tend to trigger replies and create more work.
Let customers submit requests and add information, but keep official status changes staff-only. This prevents customers from moving a return to “Received” or “Refunded” prematurely and keeps the timeline trustworthy.
Treat it like a return with a decision. Ask for the desired size or variant upfront, approve the return, and only ship the exchange after the original is received and passes inspection, unless you intentionally offer advance exchanges.
It can, as long as the form lets the customer pick the exact item and quantity being returned and you track each item clearly. If your orders often include multiple items, design the request so the customer can select one or more line items instead of typing free text.
Set expectations in the messages customers see most: the submission confirmation and the “Received” update. A simple default is to state your inspection time (for example, 1–2 business days) and when the refund typically appears after you issue it (for example, 3–5 days).
A small internal tracker is usually enough if it centralizes the form, statuses, notes, and notifications. If you want to build a lightweight returns app without stitching together inboxes and spreadsheets, Koder.ai can help you generate one from chat and tailor the fields and stages to your policy.