Dec 25, 2025·5 min
Moving Box Label Generator: Room and Priority Labels Made Easy
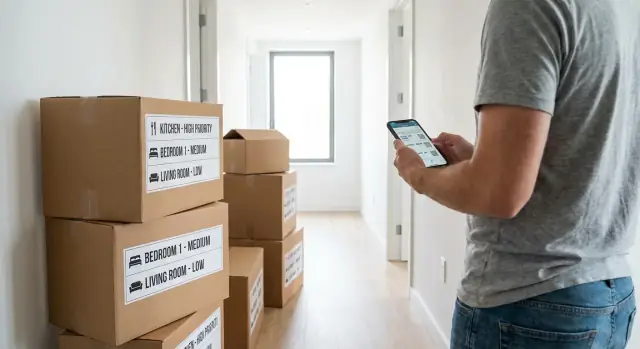
Use a moving box label generator to tag every box with room, priority, and notes, then print labels or keep them on your phone for packing day.
Use a moving box label generator to tag every box with room, priority, and notes, then print labels or keep them on your phone for packing day.
Labeling usually fails for one simple reason: you start with good intentions, then speed takes over. When you’re tired, holding tape in one hand and a half-packed box in the other, “I’ll label it later” feels harmless. Later never comes.
Unlabeled boxes trigger a chain reaction. The wrong boxes land in the wrong rooms, you open three boxes to find one charger, and fragile items end up under heavy ones. Mislabeled boxes are just as bad, like a kitchen box marked “bedroom” because you grabbed the closest marker and rushed.
“Misc” is another trap. It looks tidy in the moment, but it hides the exact info you need when it matters. A box labeled with a room name plus a clear priority (High, Medium, Low) is faster to place, faster to stack, and easier to unpack.
Label systems usually fall apart when labels are vague, hard to read, missing priority, placed on only one side, or when different people use different wording. This hits almost everyone, but it’s a big relief for families (kids need essentials fast), roommates (boxes must go to the right room), and solo movers (you can’t waste energy hunting for basics). Good labels save time twice: when loading and when you’re trying to feel settled on night one.
A label only works if it answers one question in two seconds: where does this box go, and how soon do we need it? If someone else is carrying boxes, your labels need to make sense to them too.
Keep labels simple, consistent, and readable from a few feet away. Aim for a few short lines and reuse the same structure on every box:
If a note changes how the box should be handled, add one clear handling tag. The ones people actually follow are simple and specific: Fragile, Keep upright, Do not stack, Heavy, Open first. In shared homes, an optional owner tag (Kids, Sam, Work) can also prevent confusion.
One consistency rule matters more than people think: put labels in the same spot on every box (front upper-left, for example). If you can, label two sides so it’s readable when boxes are packed tight.
Example label:
“Kitchen | High | Coffee kit + mugs | Fragile | Alex”
A priority label only helps if you can understand it in one glance, even when you’re tired, carrying a box, or talking to movers. Keep it to three levels and make the action obvious:
High priority is for daily essentials, not “important stuff.” Think toothbrush and contacts, a change of clothes, phone and laptop chargers, basic tools (box cutter, tape), kids’ bedtime items, pet food, and any medication you can’t miss. If losing that box would ruin your night, it’s High.
Color helps, but only if everyone uses the same meaning. Pick three colors and don’t change them mid-pack. A simple set that rarely confuses roommates is red = High, yellow = Medium, blue = Low.
To mark “Open first,” don’t write a paragraph. Use a short flag you can spot fast: OPEN FIRST in big text, or a single symbol like ★ next to the priority.
Decide your room list before you tape your first box. Keep it short and specific: “Kitchen”, “Primary Bedroom”, “Bathroom”, “Living Room”, “Storage”, “Office”. If you have similar spaces, name them in a way a helper understands fast (for example, “Bedroom - Closet” vs “Bedroom - Nightstand”).
Then lock in your priority scale. Three levels is enough because you can decide quickly while packing.
A practical flow that holds up under stress:
Keep the contents note short and useful. “Pans + kettle” beats “Kitchen stuff.”
Do one quick test early: hand a labeled box to someone else and ask, “Where does this go, and when do we open it?” If they hesitate, simplify the room name or make the priority more obvious.
Printing is still the fastest way to make labels readable from across a room. The goal isn’t tiny labels that save paper. It’s fewer, larger labels that save time.
A printer-friendly layout works best:
Placement matters as much as the wording. Put labels on the long side of the box, near the upper edge, not on the top. Top-only labels disappear the moment another box is stacked.
To stop peeling and smudging, cover the full label with clear packing tape. Don’t tape only the corners.
If you want to pre-print, keep it simple. For a typical apartment move, a rough starting point is:
If you run out, don’t stop to redesign and reprint. Use blank stickers (or paper rectangles) and a thick marker. An “ugly” label that’s readable is better than a perfect label that nobody can see.
A phone-first setup can be enough for many moves, especially a studio or one-bedroom. You still get clear sorting at the new place without buying ink or hunting for tape-friendly paper.
The key is to treat your phone as the label display, not something you check later. As you fill a box, assign it a room and priority, keep that label on screen while you seal the box, and read it out loud once (“Kitchen, Medium”) before you tape it shut.
Small text and low contrast fail when you’re tired and carrying boxes. Format labels like road signs:
If you’re packing with a helper, agree on the same room names and priorities. “Main bed” vs “Bedroom” seems minor until you end up with two piles later.
Have a battery backup plan: take screenshots of your High-priority labels and keep 5-10 emergency handwritten labels in your wallet, glove box, or tape kit.
Most label systems fail because they create more thinking on moving day, not less. A label should help someone else make a quick decision in two seconds.
One common trap is using too many room names. “Guest room”, “spare room”, “office corner”, and “desk area” might make sense to you, but helpers will guess. Keep to a short list of rooms you can actually point to in the new place. If the new home uses different names, decide the translation before you start packing (for example, choose whether “Den” becomes “Office”).
Another mistake is priority creep. If everything is High, nothing is. High priority should stay strict: first night or first morning essentials.
A few habits that quietly break a label system:
If you want extra detail, use 2-3 big keywords only (like “MUGS + COFFEE”), not a mini inventory.
If you only write “Kitchen” on every kitchen box, you’ll still open five boxes to find the one thing you need. Keep the room name big, then add one short detail that makes the box easy to grab later.
A few copy-ready styles (Room - Detail - Priority):
After you pick a style, stick to the same words every time. “Pantry” and “Food” mean the same thing, but mixing them makes searching harder.
A couple of optional tags can save you later without cluttering every label:
Example: “Storage | Low | Holiday decor | December” is easy to ignore now and easy to find later.
Maya and Chris are moving out of a 2-bedroom apartment on a Saturday. They have one helper for four hours, a rented van, and a hard cutoff: keys due back Sunday evening. They don’t have time for “we’ll figure it out later.”
On Friday night, they spend 10 minutes choosing rooms and priorities. They keep room names simple (Kitchen, Primary Bedroom, Second Bedroom, Bathroom, Living Room, Closet, Storage) and use a clear 3-level system so anyone can place boxes without asking:
They split the work. They print labels for anything that will be stacked or handled by someone else. For small items they’ll personally carry (documents, laptops, valuables), they keep a phone list so nothing gets taped to a box by accident.
The biggest win shows up during unloading. Instead of ten rounds of “Where does this go?”, the helper follows the label: “Second Bedroom, P2” goes straight to that room, and “Kitchen, P1” gets placed on the counter, not buried under chairs.
What they’d change next time: they’d standardize one handling tag (FRAGILE, THIS SIDE UP, or HEAVY) and commit to one labeling method from the start instead of mixing handwriting with printed labels.
Ten minutes of checking beats two hours of “where is it?” after you unload. Do this walk-through once the last room is mostly boxed, while everything is still easy to reach.
Start at the front door and move room by room. You should be able to read every label without touching a box.
After the walk-through, do a quick priority sweep: gather all High-priority boxes so they load last and unload first.
Set a timer and keep it simple. Your first template should feel almost too plain. After you label five boxes, you’ll see what’s missing and you can tweak it once, instead of overthinking it upfront.
Start with a short, consistent rooms list. Fewer options means fewer “where does this go?” moments later. Pick 6 to 10 rooms or zones and stick to the same wording every time (for example: Kitchen, Bath, Bedroom, Living, Office, Storage, Entry).
Then set one strict rule for High priority so it stays meaningful. A good rule is: “I need this in the first 2 hours after arriving.”
A simple setup that works:
If you want to build a basic label generator instead of doing it all by hand, Koder.ai can help you prototype a small web or mobile tool from a chat prompt (for example: your room list, your High-priority rule, and a printable layout).
Do a fast test, then adjust only what caused a real problem: too many rooms, unclear priorities, or not enough space for the contents line. Save the final template somewhere you’ll find it again. It’s useful for the next move, and it also works for organizing storage bins long after moving day.
Because speed wins once you’re tired and rushing. If you don’t label immediately, boxes start piling up, and you lose the chance to keep room placement and unpacking order organized.
“Misc” hides the one detail you need when you’re searching under pressure. Use a room name plus a short contents hint and a priority so you can grab the right box without opening three others.
Write the destination room and the priority first, then add a short contents line you can read from a few feet away. Only add a handling note when it changes how the box should be carried or stacked.
Use three levels that map to time: High for the first 24 hours, Medium for day one or two, and Low for anything that can wait a week. Keeping it strict prevents “everything is High,” which makes the system useless.
Put the label on the long side of the box near the upper edge so it stays visible when boxes are stacked. If you can, label two sides so you can still read it when boxes are packed tightly together.
Pick one set of room names and stick to it for every box, even if it feels repetitive. Most confusion comes from synonyms like “Main bed” versus “Bedroom,” which creates two piles in the new place.
Write one clear handling tag that matches the real risk, like “Fragile” or “Keep upright,” and keep it short. If everything is marked fragile, movers stop trusting the label.
Go with fewer, larger labels that are easy to read quickly rather than tiny labels that save paper. Cover the entire label with clear packing tape so it won’t smudge or peel during loading and unloading.
It works best when the phone is the label you use in the moment, not a list you check later. Keep the label big and high-contrast, and read it out loud while sealing the box so the room and priority are confirmed.
Create a small set of room names, lock a three-level priority rule, and place labels on the same spot every time. If you want to automate it, you can prototype a simple label generator app with Koder.ai that outputs consistent room and priority labels for printing or phone display.